10 KiB
Tutorial: Implementing the minimal RiskGateServer
In this tutorial we will create a minimal MetaTrader 5 Service that acts as the central RiskGate manager. The Service will listen on a TCP port, receive trade signals from EAs, apply risk rules, and return decisions. With KnitPkg, setting up this project takes only a few commands.
The repository riskgate-service-example implements the complete tutorial below and can be used as a reference.
Creating the Project
The first step is to open a terminal in the Data Folder of the MetaTrader 5 installation you want to work with. Open MetaTrader 5, select File > Open Data Folder, then right-click that folder in Windows Explorer and select "Open in Terminal."
KnitPkg's init command creates the project structure and generates the skeleton source files needed to start. You can provide all the project metadata directly on the command line using the available options, or you can omit them and KnitPkg will prompt you interactively. The command below creates the project in the douglasrechia namespace hosted on forge.mql5.io; adapt it to your own organization and namespace as needed:
kp init --type service --target mql5 --name riskgate-service-example --organization douglasrechia --version 1.0.0 --description "Gate risk manager service example" --keywords "risk-manager,service,showcase,risk-gate" --author "Douglas Rechia" --license "MIT" --include-mode "include" --git-init --enable-telemetry
Here is how the terminal looks like after the above command:
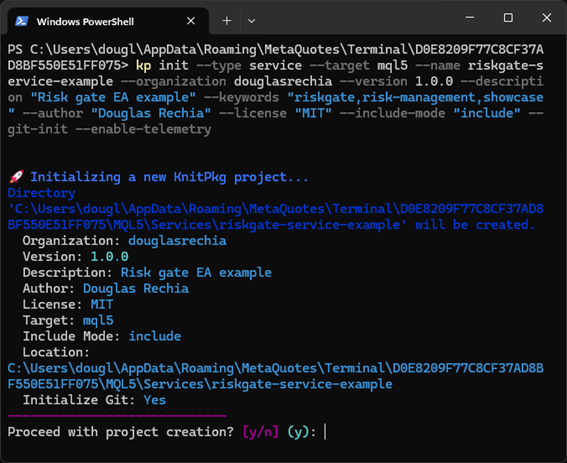
After running the command, KnitPkg CLI will display the data it will use to generate the manifest and ask for confirmation. Answer 'y' and the project will be created under /MQL5/Services/riskgate-service-example.
To open the project in VSCode immediately, use:
code ./MQL5/Services/riskgate-service-example
Note: this article assumes a Windows machine. Since version 1.1.0, KnitPkg CLI also runs on Linux. Although the command above uses POSIX path conventions, it works on both platforms.
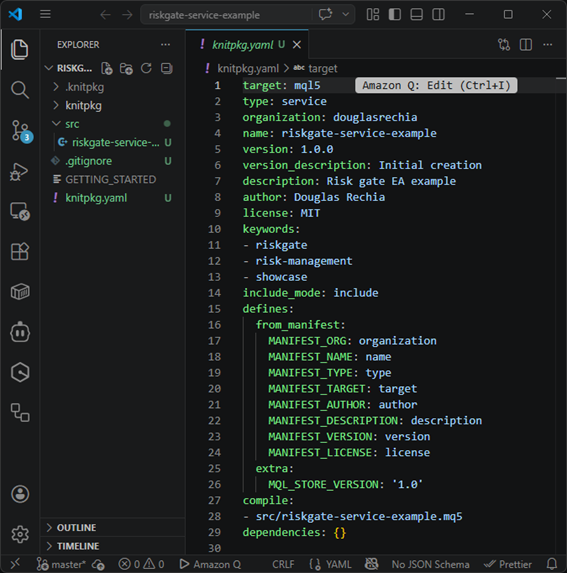
Once VSCode is open, you will see the knitpkg.yaml manifest generated by the kp init command. This manifest is the single source of truth for the project: it declares the package name, version, description, author, license, and - most importantly - its dependencies.
Adding the riskgate Dependency
The next step is to declare the riskgate package as a dependency. In the VSCode terminal, run:
kp add @douglasrechia/riskgate
The manifest's dependencies section will be updated to include @douglasrechia/riskgate. Now download the package and all its transitive dependencies with:
kp install

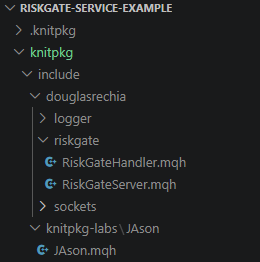
KnitPkg kp install command resolves and downloads the full dependency tree: riskgate itself, and the packages it depends on: logger, sockets, and jason. You will notice that after kp install completes, the headers of all packages are available under the knitpkg/include/<organization>/<package-name> directory. From this point on, you can include any of these headers directly in your source files:
Implementing the RiskGateHandler
The RiskGate server delegates all risk logic to a subclass of RiskGateHandler. This is the class you write. Create a new file at src/riskgate-handler.mqh and define a class called MyHandler that extends RiskGateHandler. Start by including the two headers you will need:
//+------------------------------------------------------------------+
//| riskgate-handler.mqh                                             |
//|                                                                  |
//| Example RiskGateHandler implementation.                          |
//| Rename this class and file, then implement OnSignal() with your  |
//| own risk rules and position sizing logic.                        |
//+------------------------------------------------------------------+

#include "../knitpkg/include/douglasrechia/riskgate/RiskGateHandler.mqh"
#include "../knitpkg/include/knitpkg-labs/JAson/JAson.mqh"

class MyHandler : public douglasrechia::RiskGateHandler
  {

  };
Opening RiskGateHandler.mqh, you will find in its documentation a minimal example of what an OnSignal implementation should look like. Copy that example into MyHandler:
class MyHandler : public douglasrechia::RiskGateHandler
  {
      void OnSignal(CJAVal& signal, CJAVal& response) override
        {
         string symbol        = signal["symbol"].ToStr();
         response["approved"] = true;
         response["lot"]      = 0.01;
         response["reason"]   = "";
        }

      string Name() override { return "MyHandler"; }
  };
Here you can see a full implementation of src/riskgate-handler.mqh
This minimal implementation does very little: it always approves the trade with a fixed lot of 0.01 and ignores everything in the signal. That is intentional for now. We want to focus on the procedure for building and running the Service.
Implementing the Service Entry Point
The kp init command generated a template at src/riskgate-service-example.mq5, ready to be edited. It already contains all the #property directives for copyright, link (which you must change with actual values), and description, and it includes knitpkg/build/BuildInfo.mqh, which deserves a brief explanation.
Since version 1.1.0, KnitPkg introduced the concept of compile-time constants. When you run kp compile, KnitPkg generates the header knitpkg/build/BuildInfo.mqh, which defines constants like MANIFEST_VERSION, MANIFEST_DESCRIPTION, MANIFEST_ORG, MANIFEST_AUTHOR, and MANIFEST_LICENSE, populated directly from the manifest. This means the manifest becomes the single source of truth for version and project metadata: you update it once and it propagates to the compiled Service automatically. You can also define additional constants or override existing ones using the -D option of kp compile. For full details, refer to the KnitPkg documentation.
The only changes needed in the generated template are: setting the correct values for copyright and link, and adding your includes and OnStart logic. Here is the final version of riskgate-service-example.mq5:
//+------------------------------------------------------------------+
//|                                     riskgate-service-example.mq5 |
//|                                 Service riskgate-service-example |
//|                                      Organization: douglasrechia |
//+------------------------------------------------------------------+
#property service

#include "../knitpkg/build/BuildInfo.mqh"

#property copyright   "Copyright (C) 2026 by " + MANIFEST_AUTHOR + ". All rights reserved"
#property link        "https://knitpkg.dev"
#property version     (string)MQL_STORE_VERSION
#property description ""
#property description "Version: " + MANIFEST_VERSION
#property description ""
#property description "Description: " + MANIFEST_DESCRIPTION
#property description "Organization: " + MANIFEST_ORG
#ifdef MANIFEST_AUTHOR
#property description "Author: " + MANIFEST_AUTHOR
#endif
#ifdef MANIFEST_LICENSE
#property description "License: " + MANIFEST_LICENSE
#endif
#property description ""
#property description "Powered by KnitPkg for MetaTrader"
#property description "https://knitpkg.dev"

#include "riskgate-handler.mqh"
#include "../knitpkg/include/douglasrechia/riskgate/RiskGateServer.mqh"

//+------------------------------------------------------------------+
//| Service program start function                                   |
//+------------------------------------------------------------------+
void OnStart()
  {
   douglasrechia::Logger log("RiskGate");
   log.AddHandler(new douglasrechia::PrintLogger());

   douglasrechia::RiskGateServer server(5555);
   server.SetLogger(&log);
   server.SetHandler(new MyHandler());
   server.Run();
  }
//+------------------------------------------------------------------+
The OnStart function does four things: it creates a Logger and attaches a PrintLogger so that all server events appear in the MT5 Experts tab; it instantiates RiskGateServer on port 5555; it injects the logger and the handler; and it calls Run(), which blocks in a loop until the Service is stopped. There is nothing else to write. All socket management, client pool handling, message framing, JSON parsing,nd dispatch to OnSignal happen inside RiskGateServer.
Here you can see a full implementation of src/riskgate-service-example.mq5
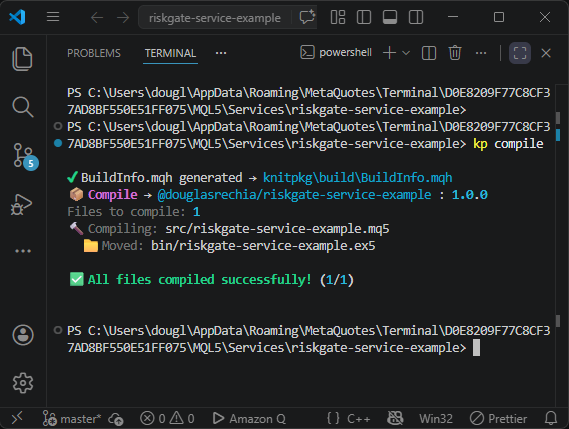
With the file saved, run kp compile to produce the compiled binary.
Starting the Service
Once compiled, locate the Service in the MetaTrader 5 Navigator panel under Services/riskgate-service-example/bin/riskgate-service-example. Double-click it to open the configuration dialog. Because RiskGate uses the Windows API to create a TCP ServerSocket, the option "Allow DLL imports" must be enabled. Check that box and click OK.

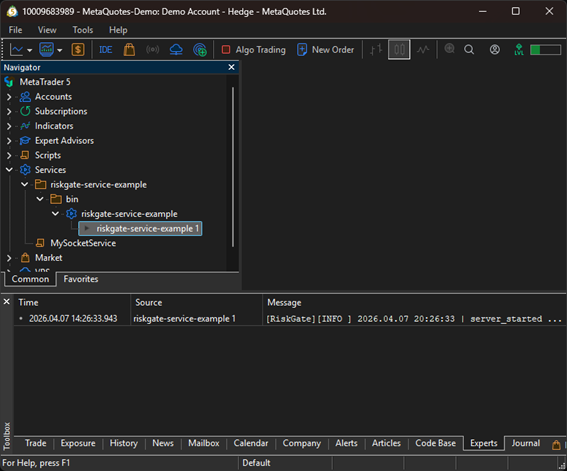
The Service starts and binds to TCP port 5555. You will see a play icon next to "riskgate-service-example 1" in the Navigator, and the Experts tab will show the server startup log entries produced by mql-logger, confirming the server is running and waiting for connections.
With the Service running, the RiskGate server is ready to receive trade signals from any EA that uses the riskgate-ea package and points its RiskGateClient to localhost port 5555. Refer to this tutorial to see how to build that EA.